ROLL UP TO RELAX
There’s nothing better than a freshly rolled joint. There’s also a lot of pride in knowing how to roll your own joint, and in doing it well. Whether new to the smoking scene or just looking for a refresher, FireHaus is here with a great how-to for rolling joints.
GATHER ALL YOU NEED
First and foremost, grab everything you’ll need. Essentials include weed, rolling papers, a filter (or something to make a filter out of), and a grinder.
GRIND
When it comes to rolling the perfect joint, it’s essential to grind your weed. Picking it apart with your fingers might be simpler, but ground weed is easier to handle. Additionally, joints are more structurally sound when made with ground weed, and tend to burn better. If you don’t have a grinder, make sure to pick your bud apart as much as you can. Using scissors helps.
MAKE A FILTER
Filters are used to prevent the inhalation of weed and provide a stable spot to grab the joint at, and may also be called a tip or crutch. Pre-made filters are available for purchase, and it can be easier to use them. However, any thicker paper (business cards, thin cardboard, cardstock) can make for a good makeshift filter. Make sure not to use any paper that has ink or a coating of any sort though, because inhaling those chemicals is not great for you. A lot of rolling papers include extra packaging designed to be cut into filters, so definitely use that if it’s an option. Take the paper, start with a few accordion-esc folds, and then roll the remainder of the paper around the folds. Keep in mind that the size of your filter determines the size of your joint, and fold it accordingly.
FILL THE JOINT
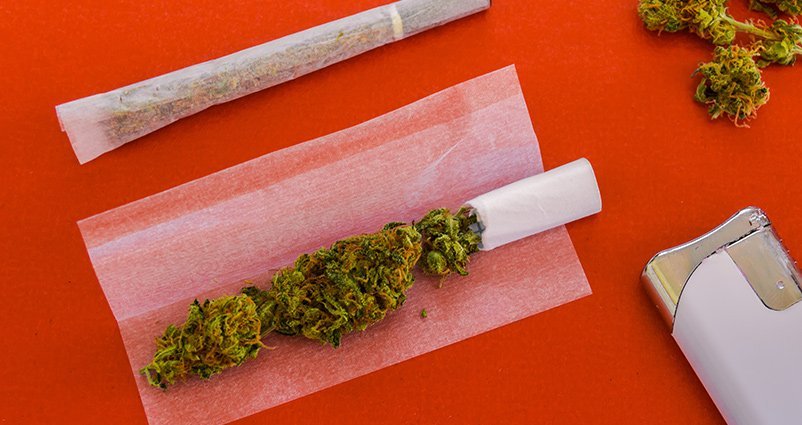
Hold the paper lengthwise. Keep the sticky part facing you, along the top. Many people find it helpful to gently fold the paper in half lengthwise first, to create a crease. Place the filter at the end of the paper. A general rule of thumb is place the filter on the side of your non-dominant hand. For example, the filter would be on the left side if you’re right-handed. Sprinkle your weed along the length of the joint.
PACK THE JOINT
Packing the joint is when you move the weed in order to shape the joint. The easiest way to do this is to fold the paper so the lengthwise ends are aligned. Pinch the top of your paper, rolling the edges back and forth to scoot the weed down. If you creased your paper, the goal is to get your weed all along the crease.
ROLL IT
Actually rolling the joint is the hardest part, so don’t be discouraged if this step takes some time to master. Take the side of the paper without glue, which should be closest to you, and tuck it around your compact weed. Lick the glue, and then roll the joint upwards into the glued part. This seals the paper.
CLOSE IT
Lastly, take the end without a filter and twist it to close off the joint. It helps to first lick your pointer finger and thumb, pinch the paper, and then twist. If your weed is too close to the opening to be twisted off, use something like a chopstick or the end of a shoelace to gently pack it towards the filter.
ENJOY!
The best way to make the perfect joint is to be in the perfect environment. Grab some friends, find somewhere scenic, and have snacks handy. And remember, your joints might not look perfect the first few times. Like anything else, practice makes perfect. Keep rolling, develop your own tricks, and you’ll have top-notch joints in no time. If, for some reason, you never quite get the hang of it, worry not: FireHaus always has pre-rolls available for purchase.


